(Note: All pictures are small because there are so many! Just click on a picture to make it larger.)
Today it finally got hot and I had to take the girls shopping for summer clothes. We picked up this shirt off the clearance rack at Old Navy.
Isn't it darling? Isn't it just crying out for a matching bow? Unfortunately, they didn't *have* any matching bows at Old Navy, so it looks like I'm going to have to make it myself. But don't worry, I have a foolproof, easy, quick technique for making hairbows that will amaze your friends and help you gain legendary status as a master crafter.
Step 1: Gather your materials.
Ribbon in colors and designs that will match the shirt (I pulled all these out of my stash of remnants)
Scissors
Upholstery thread (a good strong thread is very important)
Needle
Glue gun (with glue. Plug it in and let it heat up.)
Hair clip
I had included some other stuff, but I didn't end up using it.
Step 2: Cut your ribbon.
You build the bow with wider ribbon in back, narrower in front. I have 2 ~7" sections of the wide purple ribbon, 2 slightly shorter sections of the olive and white, a 1 even shorter alphabet ribbon.
Step 3: Make loops.
This is where you put those sewing skills to the test. And trust me, you don't have to have much in the way of "skills".
Thread your needle with an arm's length piece of upholstery thread and tie the ends in a knot. Overlap the edges of the ribbon by about half an inch and sew a seam into it. It doesn't have to be pretty as no one will ever see the thread. You do, however, have to sew it, as hot glue will make the seam too thick and stiff and I'll tell you why that's bad in a couple of steps.
Make all of your ribbons into loops.
Step 4: Put the loops together.
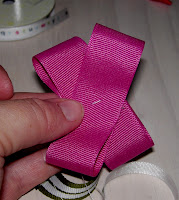
Grab one of the big ribbon loops and pinch it in the middle so that it forms a bow shape.
Put one stitch in the middle to hold it together and leave the needle dangling.
Place the second big ribbon loop over the first one so that it forms an X and put another stitch through both ribbons.
Step 5: Finish off the bow.
Remember how I said you need to sew the ribbon instead of using hot glue? This step is why. You've got a nice looking stack of ribbon loops there, but you need to have a gathered look to the center to give it dimension.
Take the dangling needle and thread and wrap it around the center of your bow, drawing it into a tight knot. That's why you need that extra strong upholstery thread because the regular stuff will snap right off. Go around it a second time, drawing the knot even tighter.
Put in a couple of extra stitches to hold the center thread and snip off the thread (yea! you're done with the sewing!). Pull the loops straighter and make it look all neat and balanced.
Step 6: Attach the bow to the hair clip.
Put a line of hot glue across the top of the clip and secure it straight across the back of the bow.
Glue one end of a short piece of ribbon to the inside of the hair clip.
Wrap the ribbon around the front of the bow and back to the underside, securing it again with the hot glue. Trim off any excess ribbon.
Voila!
One completely cute, completely easy hairbow! And trust me, it took me a whole lot longer to write this post than to make the bow!
Tuesday, May 27, 2008
WFMW: Hairbows anyone can make
Subscribe to:
Post Comments (Atom)


6 comments:
Thanks for posting this! I have a whole box of ribbons just waiting to be turned into bows. I think I'll try your method today.
So sweet! I wish that top came in my size.
That looks so easy...I have never been able to make a nice hairbow- I think I can do it this way! Thanks,
Tracy
I love making hairbows. And this is a variation I haven't done yet. Thanks for posting this- especially with pictures.
Valerie; you're brilliant!! I am a total loser when it comes to hair bow craftiness but now I feel empowered!! I CAN DO IT!!:) Thanks so much for visiting my site and hopefully I'll get to meet you at She Speaks! I'll be the lady in her 30's who is wearing beautiful hairbows...okay, not really; I'll save them for my daughter!:)
How cute!!! Reminds me of the bows I wore as a child.. I love it!! Thanks for posting the tip!!!
Post a Comment